Posts from the ‘March Challenge’ Category

Easy French Toast

French toast is a really simple breakfast meal that you can make pretty quickly….this is just the basic recipe that I think anybody that has cooked for a while knows… you could make it “pop” a little by adding orange zest, which I think would be a fabulous complimentary flavor.

INGREDIENTS (makes 6 slices)

  • 6 bread slices (can use french bread, regular bread, whatever bread you like)
  • 4 eggs
  • 1/2 tsp vanilla
  • 1/4 tsp cinnamon (approx)
  • 1/4-1/2 cup heavy whipping cream (or milk)

INSTRUCTIONS

  1. break eggs into a large plate or casserole dish
  2. add whipping cream, cinnamon, and vanilla to eggs and whip well with fork
  3. dip bread slices into egg mixture so both sides are coated
  4. place bread onto lightly greased (using PAM or oil), vented oven pan (the kind that comes with your oven when you buy it) and cook on 500 for about 10 minutes or until bread appears “dry” (instead, you could fry bread in a skillet)
  5. serve with syrup, whipped cream, powdered sugar, and/or fresh fruit

I’ve only made french toast using the oven method described above (today actually) once, but I found the toast to be more moist than the usual frying method…I will probably continue to use this method in the future for making this recipe…

Homemade Yogurt Cheese

I stumbled upon yogurt cheese when making tzatziki the other day…don’t know why it never dawned on me before to taste the drained yogurt …. it was almost like cream cheese! I’ve made Quark in the past, aka buttermilk cheese, but it has a very sour taste.

I used a large container of 2% plain yogurt (NOT STIRRED) and placed it in a cheese cloth and let it drain in a strainer for about 8 hours (or overnight). It will be fine to let it drain in your sink as long as your kitchen isn’t too hot. …. You could also use a yogurt maker (which I have and haven’t used yet!)

I loved the creamy consistency that resulted from this process and will make it a regular substitute for cream cheese. I plan to add my own herbs, etc next time to make what I know will be some awesome creamy cheese spread.

Golden Potato-Rutabaga Whip

This recipe comes from the cookbook Vegetarian Times Complete Cookbook (pg 379) and was actually quite good, though I made some modifications to the original recipe which resulted in 5 ingredients or less (not counting salt/pepper).

The original recipe ingredients are listed below with my modifications noted underneath them. For instructions I’ll summarize what I did and you can check out the actual recipe in the cookbook if you want (though it was WAY more complicated in my opinion).

Original Recipe

  • 1-1/2 lb baking potatoes, scrubbed
  • 1-1/2 lb rutabaga
  • 1/2 cup evaporated skim milk
  • cooking water
  • 2 tbsp butter or margarine
  • 1 tsp salt, or to taste (optional)
  • 1/4 tsp white pepper, or to taste
  • pinch ground nutmeg

My Modifications

  • 3 med-large yukon gold or other red potato, peeled and chopped
  • 2 med rutabaga, peeled and chopped
  • 1 tsp butter
  • 1/4 cup heavy whipping cream
  • salt & white pepper to taste

INSTRUCTIONS

  1. boil chopped rutabaga in water for about 5-8 minutes then add the potatoes and continue to boil until tender (about 12-15 minutes more)
  2. drain the potatoes/rutabaga and return to pan for mashing
  3. add the heavy cream (to dull the “raw” flavor of the rutabaga) and mix well
  4. add butter, salt and pepper

Comments:

To ensure the rutabaga is cooked to a similar consistency as the potatoes, they need to boil a little longer to soften as they are much denser than potatoes. You could use a lighter version of whipping cream I feel certain without much difference in flavor. My husband didn’t even realize there were rutabagas in the “yellow mashed potatoes”! I’ll definitely make this (modified) recipe again!

No-Knead Bread

I found this recipe on the NY Times website (from Sullivan St. Bakery in NY) quite a while ago and have made this bread a couple of times. It is fabulous. It is super simple but takes a while to get the end product as it must rise for 12-18 hours before baking. This is a wonderful light bread with a crispy outer crust….wonderful!

NOTE: Some people say that using parchment instead of a towel to allow the 2nd rising is not as messy so I might try that next time. Personally, I haven’t had any problems using a towel – just make sure it’s a tight weave and you flour it really, really well!

UPDATE: I’ve made this at least 5 times now and it is always wonderful…. make sure you let the cooking bowl warm before baking as it really does seem to make for a crispier crust and your bread won’t stick (as much if at all). Also, I’ve made this with 1/2 multi-grain bread flour and 1/2 regular flour and it was great…. and I’ve made it in a regular stoneware loaf pan which also turned out nice.

The original recipe is below:

3 cups all-purpose or bread flour, more for dusting
¼ teaspoon instant yeast
1¼ teaspoons salt
Cornmeal or wheat bran as needed.

1. In a large bowl combine flour, yeast and salt. Add 1 5/8 cups water, and stir until blended; dough will be shaggy and sticky. Cover bowl with plastic wrap. Let dough rest at least 12 hours, preferably about 18, at warm room temperature, about 70 degrees.

2. Dough is ready when its surface is dotted with bubbles. Lightly flour a work surface and place dough on it; sprinkle it with a little more flour and fold it over on itself once or twice. Cover loosely with plastic wrap and let rest about 15 minutes.

3. Using just enough flour to keep dough from sticking to work surface or to your fingers, gently and quickly shape dough into a ball. Generously coat a cotton towel (not terry cloth) with flour, wheat bran or cornmeal; put dough seam side down on towel and dust with more flour, bran or cornmeal. Cover with another cotton towel and let rise for about 2 hours. When it is ready, dough will be more than double in size and will not readily spring back when poked with a finger.

4. At least a half-hour before dough is ready, heat oven to 450 degrees. Put a 6- to 8-quart heavy covered pot (cast iron, enamel, Pyrex or ceramic) in oven as it heats. When dough is ready, carefully remove pot from oven. Slide your hand under towel and turn dough over into pot, seam side up; it may look like a mess, but that is O.K. Shake pan once or twice if dough is unevenly distributed; it will straighten out as it bakes. Cover with lid and bake 30 minutes, then remove lid and bake another 15 to 30 minutes, until loaf is beautifully browned. Cool on a rack.

Yield: One 1½-pound loaf.

Quick Pizza Dough

I found this recipe today on the Food Network website (originally from Gourmet magazine) for a quick pizza dough…which was good since I decided about 1 hour before supper time that I wanted pizza!

The claim was that you could make this dough and let it rise for 30 minutes and make your pizza fresh in a jiffy. I have to say, it did only take a few minutes to prep my dough and about 30 minutes later it had doubled as promised.

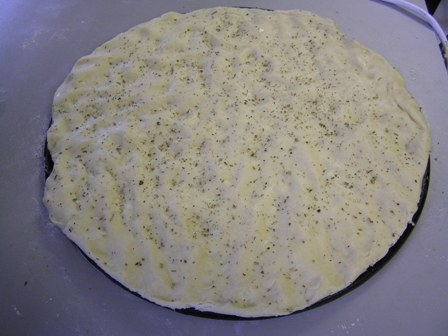
quick pizza dough with italian seasoning

NOTE: When you take it from the bowl and place in on your pizza stone, just use your fingers to press it out by starting in the center and working your way outwards. Also, pizza dough that has been refrigerated or frozen should be at room temperature before forming into a pie as it will spread on your stone much easier. If you want your pizza a little thicker, just let it rise about 20 minutes once you’ve gotten the FRESH dough ready for toppings. Also, pre-cook your pizza dough for about 10 minutes at 500 to help ensure you don’t end up with a doughy/uncooked pizza crust.

I quickly assembled my pizza with veggies, cheese, and meat and baked it at 500F until the cheese was melted and gooey! While this wasn’t a crust like you’d get from a pizzeria, it was pretty good….we ate it without any complaints!

Original recipe is listed below:

2 to 2 1/4 cups unbleached all-purpose flour
1/4-ounce package fast acting yeast
1/2 teaspoon sugar
2 tablespoons olive oil
1/2 teaspoon salt

In a large bowl whisk together 3/4 cup of flour, yeast, sugar, and 2/3 cup hot water (130 dgrees F). Stir in the oil, 1 1/4 cups of the remaining flour, and the salt and blend the mixture until it forms a dough. Knead the dough on a floured surface, incorporating as much of the remaining 1/4 cup flour as necessary to prevent the dough from sticking, for 5 to 10 minutes, or until it is smooth and elastic.
Alternatively, the dough may be made in a food processor. In a food processor combine 3/4 cup of the flour, yeast, and sugar. With the motor running, add 2/3 cup hot water (130 degrees F), and turn the motor off. Add the oil, 1 1/4 cups of the remaining flour, and the salt and process the mixture until it forms a ball, adding more water, 1 teaspoon at a time, if it is too dry, or more flour, 1 tablespoon at time, if it is too wet. Knead the dough by processing it for 15 seconds.
The dough, prepared by either method, may be used immediately, but for better flavor it is best to let it rise once. Put the dough in an oiled bowl and turn it to coat it with the oil. Let the dough rise, covered with plastic wrap, in a warm place for 30 minutes, or until it is double in bulk, and punch it down. This dough may be used instead of the basic pizza dough.